If you’ve been following my iPod mods on TikTok lately, you might have caught a quick 30-second clip where I added Bluetooth to an iPod Nano 3rd generation. And while those short videos are fun, there’s just way too much detail to squeeze in—so here’s a full blog post breaking down how I did it, what parts I used, challenges I faced, and tips if you’re looking to try this yourself.
The Bluetooth Module I Used
For this mod, I used the KCX_BT_Emitter V1.7 — a super affordable Bluetooth transmitter board I picked up from AliExpress for around $3. This board is a simple transmitter that connects to a lithium-ion battery and an audio source (in this case, your iPod’s headphone jack). It has a built-in antenna, a pairing button, and can be powered by anything from 3.3V up to 5V. Here is a link to buy it on aliexpres (affiliate link): https://s.click.aliexpress.com/e/_oB8m4J1

Understanding the Signal Challenge
Since iPods — especially older models — are largely encased in metal, the built-in antenna can struggle to broadcast the signal properly. Bluetooth signals don’t travel well through metal, so placement is critical. On the Nano 3rd Gen, I routed the antenna behind the screen, which is plastic. That allows the signal to pass through without obstruction. If you’re doing this on a Classic 5th Gen, for example, you could get away with using the default antenna thanks to the plastic front. On later models like the 6th or 7th Gen, you’d want to omit the metal plate behind the screen to ensure a solid signal.
Bonus Tip for iPod Mini:
On the iPod Mini, I had to route the antenna up through the top plastic panel, which takes a little extra work but gives great results once done.
How Do You Pair Headphones With No UI?
A lot of people ask how you can pair Bluetooth headphones when your iPod doesn’t have any UI for that. Good question — the board has a simple physical pair button. You just hold your headphones in pairing mode, press the button, and that’s it.
But here’s the thing: you’ll need to make sure that button is accessible after the iPod is sealed back up. On the Mini, I tucked the button beneath the bottom plastic so you can press it by gently pushing that spot. On the Nano 3rd Gen, I didn’t have the same luxury — so I drilled a hole in the back housing for direct access. Not the prettiest, but it works!
On the iPod Classic 5th–7th Gen, there’s a neat trick: you can repurpose the hold switch. Glue a small button under it, and it acts as both a switch and a pair button — slick and invisible. I saw this on another YouTuber’s video, and it’s brilliant.
Weird Power Behavior on the Nano and Classic
Here’s something strange I noticed: when powering off the Nano 3rd Gen or Classic 5th Gen, the Bluetooth board keeps drawing power through the headphone jack. Even when I disconnected the battery, the board would half-power itself from the iPod, causing an awful screeching white noise when headphones were plugged in. I later found that this was due to me wiring the power switch up to the negative lead to the bluetooth board. Doing this meant that the board would still stay powered though the audio ground wire running off of the headphone jack. To fix it you would want to wire the switch up to the positive lead instead.
Step-by-Step Breakdown of the Mod
Let’s get into the actual work.
- Open the Nano 3rd Gen
First, take the iPod apart. If you haven’t already, check out my Nano 3rd Gen Ultimate Repair Guide for a complete teardown tutorial. We need to remove the logic board and battery to make space for the Bluetooth module.
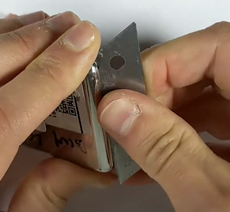
- Remove the Internal Metal Plate

You’ll find a metal plate inside the casing that we need to remove. This frees up space for the Bluetooth board, which will sit just above the memory chip.
Note: If you’re using an 8GB model, some of them have two stacked memory chips — in that case, the Bluetooth board won’t fit. Use a 4GB model or an 8GB unit with a single memory chip instead.
- Sand Down the 30-Pin Connector Housing

There’s a gray plastic post sticking up near the 30-pin dock. I sanded this flat to mount a power switch, scavenged from a broken Nano 1st Gen logic board. This switch lets you cut power to the Bluetooth module to prevent battery drain.
4. Prepare the Bluetooth Board
Before installing the board:
- I desoldered the external antenna connector (since we’re not using it).

- I removed any bulky components that weren’t essential.
- I extended the built-in antenna with two wires and routed them behind the screen.

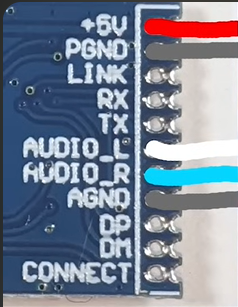
- Wiring the Board

You’ll need:
- Red wire (positive) and black wire (negative) from the battery
- Left audio, right audio, and ground from the headphone jack
- Optional: two wires for the relocated antenna
- Optional: two wires for the power switch
Color-code your wires so you don’t confuse them later. Once the board is installed, it’s tough to read the silkscreen labels.
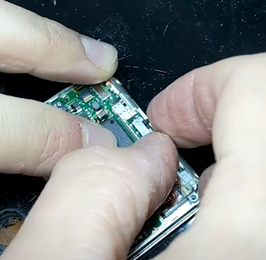
Trim the leads flush with the board to maximize clearance and avoid contact shorts. I used tweezers to carefully inspect spacing and ensure nothing was touching.
6. Install the Power Switch
I glued the switch directly on top of the 30-pin port. You could theoretically reuse the hold switch, but on the Nano 3rd Gen, it’s soldered directly to the board. Flipping it and rewiring it is way more trouble than it’s worth here.

7. Mount the Bluetooth Board
Use Kapton tape and double-sided adhesive to secure the board inside the housing. Keep wires short — space is tight, and long wires will stop the case from closing properly.


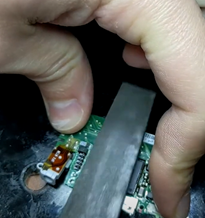
8. Connect to the Headphone Jack
Use a multimeter and a headphone jack pinout to figure out which solder pads are Left, Right, and Ground. I made sure each wire was as short as possible, with minimal slack.

If you mess this up, you’ll have to redo all the wiring. Trust me — better to measure twice and cut once here.
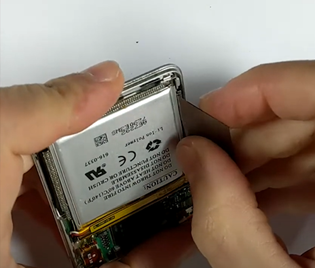
9. Battery Connection: USE THE BMS!
This is super important: always connect to the Battery Management System (BMS), not directly to the lithium cell. The BMS protects against:
- Over-discharging (drops below 3V = dead battery)
- Overheating
- Potential fire risk
I hooked the board’s power leads to the BMS’s red and black wires (not directly to the metal battery tabs) to preserve all those protections.
Reassembly and Final Testing
Once all the internal components are installed and secured, it’s time to reassemble the iPod and test everything out. This part might seem simple, but take your time — it’s easy to pinch wires or misalign components, especially in such a tight chassis like the Nano 3rd Gen.
Close It All Up
Before snapping the iPod back together, double-check:
- No wires are sticking out or bent.
- The battery is secured and won’t shift around.
- The Bluetooth board isn’t pressing up against the screen or click wheel.
Carefully snap the back housing into place, making sure each clip is aligned. If you drilled a hole for the Bluetooth pair button, now’s the time to test if you can press it comfortably from the outside.
Power On and Test Bluetooth
With everything sealed, power on the iPod and flip the switch you installed for the Bluetooth module.
- Put your Bluetooth headphones into pairing mode.
- Press the pairing button (or use your repurposed hold switch, if you went that route).
- Wait for the LED on the Bluetooth board to blink, and listen for the audio confirmation from your headphones.
Once paired, play some music to check:
- Left and right audio channels are working.
- No white noise or buzzing.
- Bluetooth doesn’t disconnect under regular use.
You can also try moving the iPod around to see if there’s any signal drop — especially important if you routed your antenna behind the screen or elsewhere.
Recap & Tips for Next Time
Adding Bluetooth to the iPod Nano 3rd Gen is one of those mods that feels like magic when it works. You’re breathing new life into an iconic device with modern convenience — and that’s what makes this hobby so rewarding.
Here’s a quick recap:
- Biggest challenges: Space constraints and safe wire routing.
- Pro tips: Use Kapton tape, label wires, and always test before final assembly.
If you made it this far, give yourself a pat on the back — and if you’re documenting your own mod, tag me or leave a comment! I love seeing the creative ways people solve space and signal challenges in these builds.